Set Up Oauth Login (Self-Hosted)
Via Github, Gitlab, or Bitbucket
A service provider is the product you use to host your source code. Codecov integrates with GitHub, Github Enterprise, Bitbucket, Bitbucket Server (formally Stash), GitLab and GitLab Enterprise.
Please choose one or more provider to link with your Codecov Enterprise via Oauth login. This step is mandatory for setup.
Do not indent your service provider configurationA common configuration error is to indent the service provider configuration under the setup block in your codecov.yml. This will result in errors when running codecov enterprise.
When adding service providers, be sure to add them to the codecov.yml as follows:
setup:
    # various setup configs
github_enterprise:
    # provider config
Are you using Github.com or Github Enterprise?In addition to setting up the Oauth login below (which is mandatory), it is strongly recommended to use the Github App Integration for Codecov Self-Hosted
GitHub.com
Below is the guide to link Github.com to your Codecov Self-Hosted.
Step 1 - Create a new application
- Create a new application at
https://github.com/settings/applications/new - Fill in an Application Name, ex
Codecov Enterprise - (optional) Upload Codecov avatar
- Specify Homepage URL to your CE endpoint
https://codecov-enterprise-hostname.com - Specify the Authorization Callback URL
https://codecov-enterprise-hostname.com/login/github - Click Register Application
- Store the Client ID and Client Secret for use in the configuration below
Step 2 - Configuration
Append the information collected in step 1 in your self-hosted codecov.yml.
github:
  client_id: "Client ID"
  client_secret: "Client Secret"
Step 3 - Restart
Restart your Codecov Self-Hosted to complete the integration.
GitHub Enterprise
Your Github Enterprise (GHE) is a self-hosted instance of Github. It likely located behind your firewall. Codecov Self-Hosted will need to communicate with your GHE to function properly. Please follow these configuration steps to setup your instance properly.
Please replace https://enterprise-hostname.com with the root url of your GHE.
Step 1 - Create a new application
- Create a new application at
https://enterprise-hostname.com/settings/applications/new - Fill in an Application Name, ex
Codecov Self-Hosted - (optional) Upload Codecov avatar
- Specify Homepage URL to your Codecov Self-Hosted endpoint
https://codecov-enterprise-hostname.com - Specify the Authorization Callback URL
https://codecov-enterprise-hostname.com/login/ghe - Click Register Application
- Store the Client ID and Client Secret for use in the configuration below
Step 2 - Configuration
Append the information collected in step 1 in your enterprise codecov.yml.
github_enterprise:
  url: "https://enterprise-hostname.com"
  api_url: "https://enterprise-hostname.com/api/v3"
  client_id: "Client ID"
  client_secret: "Client Secret"
Step 3 - Restart
Restart your Codecov Self-Hosted instance to complete the integration.
Bitbucket.org
Below is the guide to link Bitbucket.org to your Codecov Self-Hosted Instance.
Step 1 - Add OAuth consumer
- Create a new OAuth consumer
- Goto
https://bitbucket.org/account/user/USERNAME/oauth-consumers/new - Replace
USERNAMEwith your username or team name above - You may review Bitbucket's guide too
- Fill in an Application Name, ex
Codecov Self-Hosted - Fill in an Callback URL to
http://codecov.domain.com/login/bitbucket - Fill in an URL to
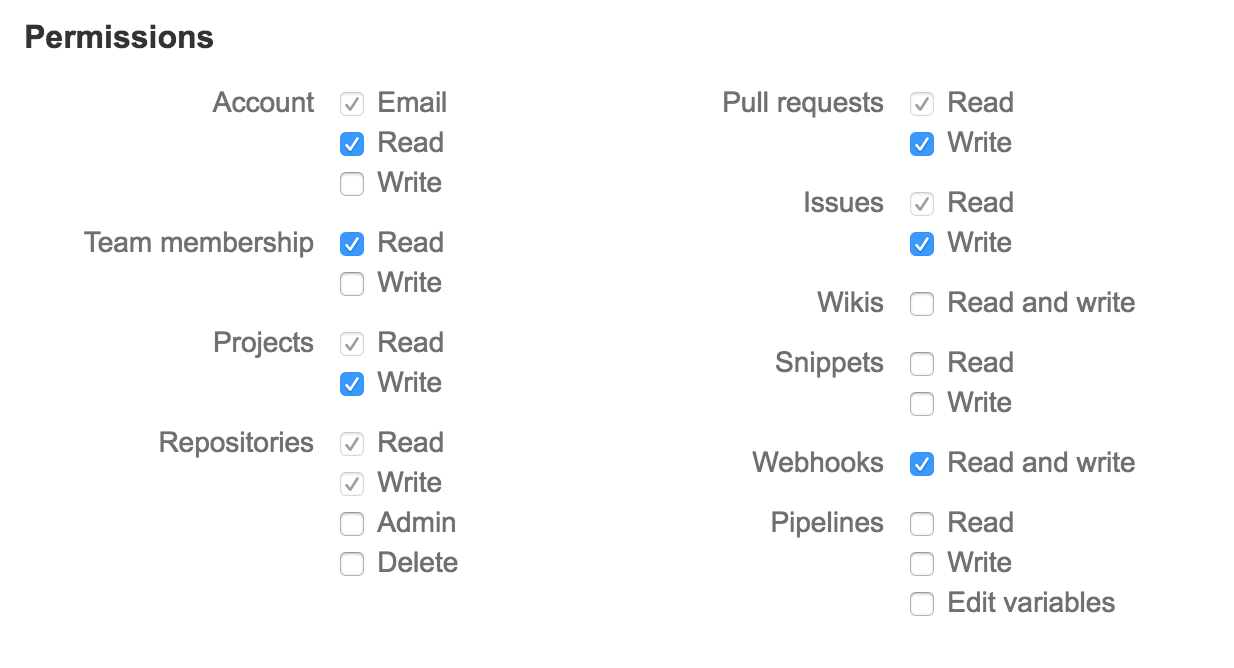
http://codecov.domain.com/bb - Toggle the permissions as seen in the image below.
- Click Save
- In your list of OAuth Consumers click on your new entry.
- Copy the Key and Secret for your codecov.yml

In addition, this box must be checked in order for BitBucket to share the credentials back to Codecov.

Step 2 - Configuration
Append the information collected in step 1 in your enterprise codecov.yml.
bitbucket:
  client_id: "key"
  client_secret: "secret"
Step 3 - Restart
Restart your Codecov Self-Hosted instance to complete the integration.
Bitbucket Server / Bitbucket Enterprise
Bitbucket Server (BBS, formerly Stash) is a self-hosted instance of Bitbucket. Codecov Self-Hosted will need to communicate with your BBS to function properly. Please follow these configuration steps to setup your instance properly.
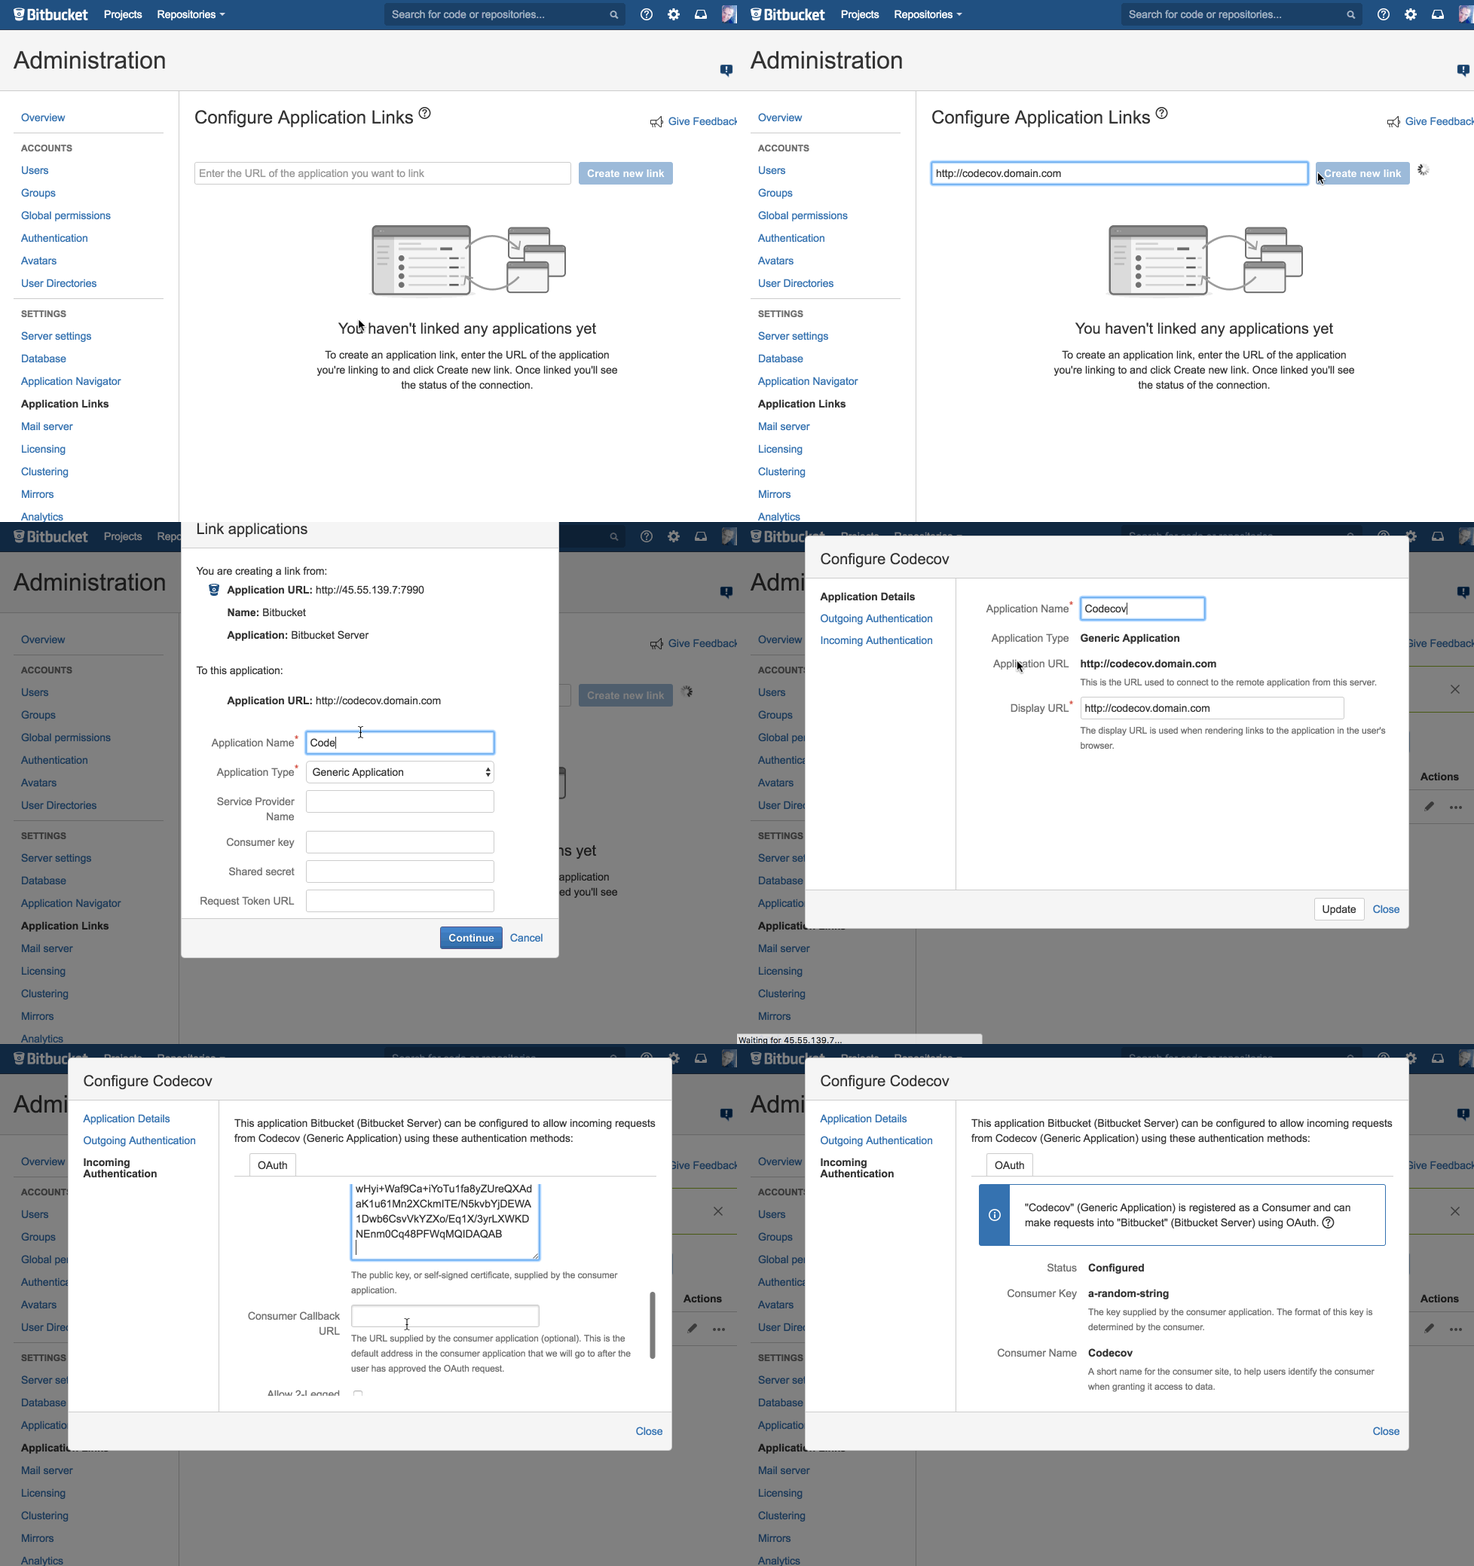
Step 1 - Create a new Application Link
- Create a unique Consumer Key, ex UUID:
a49d1f9e-294c-4cd6-a44c-e5e4440e67c9 - Configure Application Link at
<BBS>/plugins/servlet/applinks/listApplicationLinks - Enter the URL of your Codecov Self-Hosted instance (
<CCE>) next to Create a new link button - Fill in application details
- Application Name: Codecov
- Application Type: Generic Application
- Leave the remaining field empty.
- Click *Continue
- Now the link is added. Please click Edit on the Codecov link.
- Click on the tab Incoming Authorization
- Fill in the details:
- Consumer Key with your generated client id.
- Consumer Name with
Codecov - Public Key (see below)
- Consumer Callback URL with
<CCE>/login/bitbucket_server
- Click Save
You should now see Codecov in your Application Links
MIGfMA0GCSqGSIb3DQEBAQUAA4GNADCBiQKBgQC9d2iMTFiXglyvHmp5ExoNK2X8nxJ+1mlxgWOyTUpTrOKRiDUbZoZID3TP8CobQ5BsqDOSawHyi+Waf9Ca+iYoTu1fa8yZUreQXAdaK1u61Mn2XCkmITE/N5kvbYjDEWA1Dwb6CsvVkYZXo/Eq1X/3yrLXWKDNEnm0Cq48PFWqMQIDAQAB
Step 2 - Configuration
Append the information collected in step 1 in your self-hosted codecov.yml.
bitbucket_server:
  url: "<BBS>"
  client_id: "Consumer Key from above"
Step 3 - Restart Codecov container
Restart your Codecov Self-Hosted container to complete the integration.
GitLab.com
GitLab.com follows the same install setup as GitLab CE/EE below.
GitLab CE/EE
Your Gitlab Enterprise (CE/EE) (aka GLE) is a self-hosted instance of Gitlab. It's likely located behind your firewall. Codecov Self-Hosted will need to communicate with your GLE to function properly. Please follow these configuration steps to setup your instance properly.
Link your Gitlab Enterprise to Codecov Self-Hosted
Please replace https://enterprise-hostname.com with the root url of your GLE.
Using GitLab.com?If you're using gitlab.com's hosted offering, you should use
https://gitlab.comas your root url.
Step 1 - Create a new application
- Create a new application at
https://enterprise-hostname.com/profile/applications - Fill in an Application Name, ex
Codecov Self-Hosted - Specify the redirect URI for your CE endpoint
https://codecov-enterprise-hostname.com/login/gitlab_enterprise - Select all scopes except
sudo - Click Submit
- Store the Application Id and Secret for use in the configuration below
Step 2 - Configuration
Append the information collected in step 1 in your self-hosted codecov.yml.
gitlab_enterprise:
  url: "https://enterprise-hostname.com"
  client_id: "Application Id"
  client_secret: "Secret"
Step 3 - Restart Codecov container
Restart your Codecov Self-Hosted container to complete the integration.
Have a self-signed SSL certificate? Add your
ssl.pemwith this documentation.
Include ssl.pem for self-signed SSL
Two steps: (1) add the ssl pem location to your codecov.yml, (2) include it in your docker run
gitlab_enterprise:
ssl_pem: "/gle.ssl.pem"docker run -it --rm \
-v "$PWD/codecov.yml:/codecov.yml" \
-v "$PWD/gle.ssl.pem:/gle.ssl.pem" \ # this is added
--link codecov-redis:redis \
--link codecov-postgres:postgres \
codecov/enterprise:v?.?.?Updated 3 months ago