Test Analytics
Have feedback? Drop us a line on Github at https://github.com/codecov/feedback/issues/637
Only JUnit XML test result files are supported at the momentThe only test result file format we support is JUnit XML at the moment. Most test frameworks support outputting test results in this format, with some configuration.
Each testing framework will have slight differences in the JUnit XML format it outputs, we'd like to support all of them.
If you receive an error message in your PR comment regarding a error parsing your file, please open an issue here.
Test Analytics is a new set of features from Codecov that provides insights into the health of your test framework. It provides you with
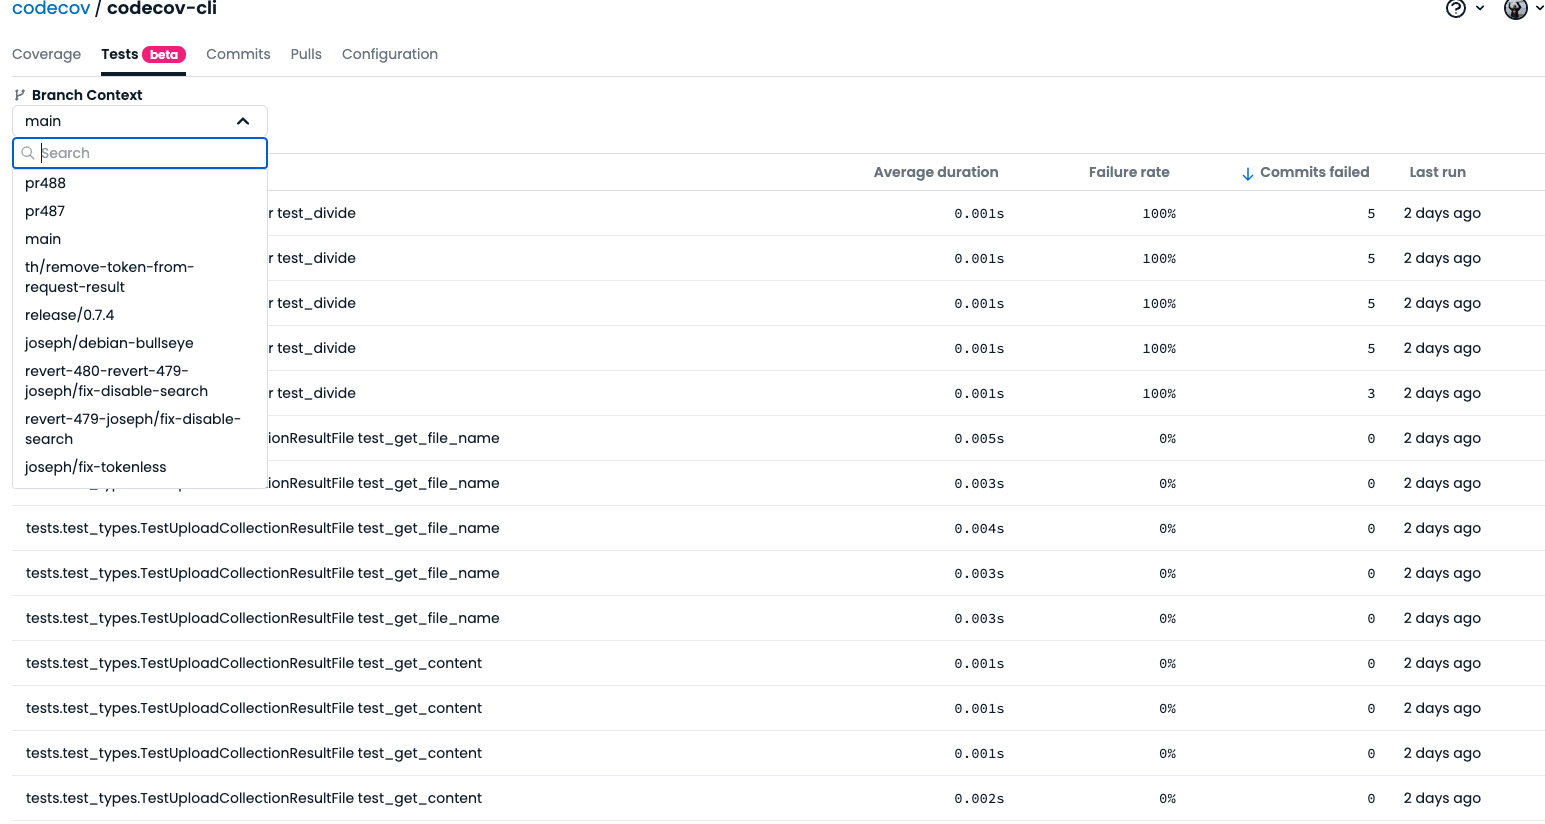
- An overview of test run times and failure rates for all tests across main and feature branches
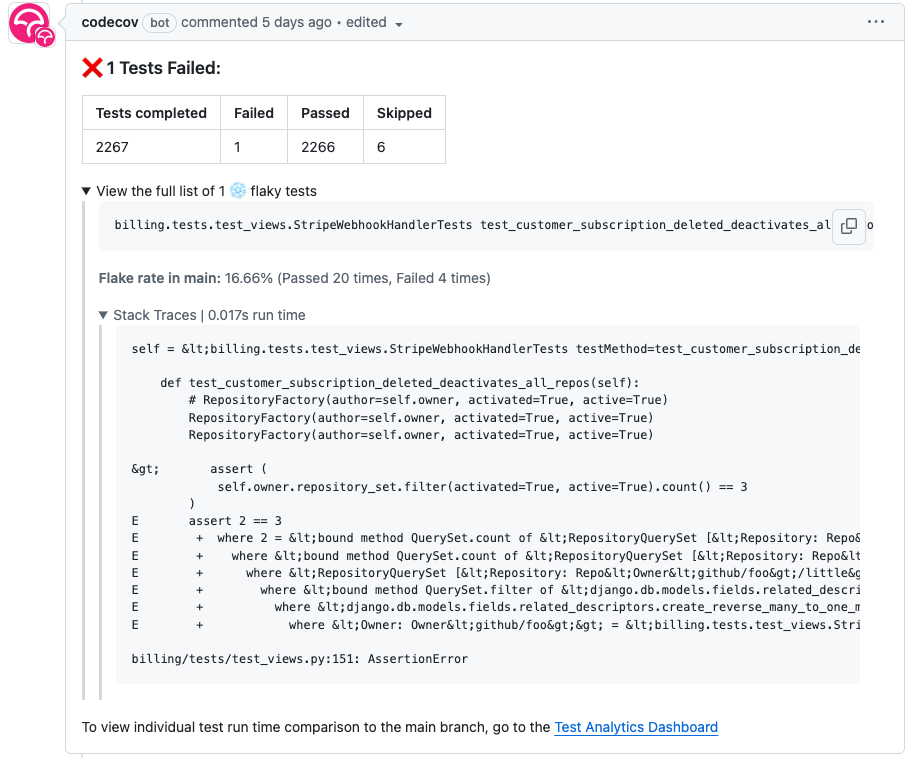
- A list of tests that your PR failed as a PR comment, along with a stack trace : enabling easier debugging
- A list of failed tests that are known to be flaky on main, that your PR failed, as a PR comment : enabling quicker retry and resolution.
Prerequisite
- You're set up with a Codecov upload token (
CODECOV_TOKEN). - You're using a test runner that supports test results output in JUnit.
Set up using the action
1. Output a JUnit XML file in your CI
Here are some ways to generate JUnit XML when using the following common frameworks:
pytest --cov --junitxml=junit.xml -o junit_family=legacyvitest --reporter=junit --outputFile=test-report.junit.xmlnpm i --save-dev jest-junit
JEST_JUNIT_CLASSNAME="{filepath}" jest --reporters=jest-junit./vendor/bin/phpunit --log-junit junit.xmlThe above snippets instruct the framework to generate a file (junit.xml) that contains the results of your test run. Include the optional junit_family flag to have pretty-printed test names in the Codecov UI.
2. Add the script codecov/test-results-action@v1 to your CI YAML file
codecov/test-results-action@v1 to your CI YAML file- name: Upload test results to Codecov
if: ${{ !cancelled() }}
uses: codecov/test-results-action@v1
with:
token: ${{ secrets.CODECOV_TOKEN }}This action will download the Codecov CLI, and upload the junit.xml file generated in the previous step to Codecov.
Your final ci.yml for a project using pytest could look something like this:
jobs:
unit-test:
name: Run unit tests
runs-on: ubuntu-latest
steps:
- name: Checkout
uses: actions/checkout@v4
with:
fetch-depth: 0
- name: Set up Python 3.11
uses: actions/setup-python@v3
with:
python-version: 3.11
- name: Install dependencies
run: |
python -m pip install --upgrade pip
pip install -r requirements.txt
- name: Test with pytest
run: |
pytest --cov --junitxml=junit.xml -o junit_family=legacy
- name: Upload coverage to Codecov
uses: codecov/codecov-action@v5
with:
token: ${{ secrets.CODECOV_TOKEN }}
- name: Upload test results to Codecov
  if: ${{ !cancelled() }}
  uses: codecov/test-results-action@v1
  with:
token: ${{ secrets.CODECOV_TOKEN }}Arguments
This page of the docs describes how each file search argument works.
This section of the Action's README describes all available arguments to the action.
Ensure you're always uploading coverage and test results to Codecov - even if tests failIf tests fail, your CI may stop there and not execute the rest of your workflow.
If this is the case, to make sure test results are uploaded to Codecov, you will need to add some configuration so that your CI will run the steps to upload to Codecov, even in the case of test failures.
For Github Actions, there are a couple of ways to do this:
Set up by directly using the CLI
1. Install Codecov's CLI in your CI
Here's an example using pip
pip install codecov-cliThe CLI also offered as binaries compatible with other operating systems. For instructions, visit this page
2. Output a JUnit XML file
Codecov will need the output of your test run. If you’re building on Python, simply do the following when you’re calling pytest in your CI.
pytest <other_args> --junitxml=<report_name>.junit.xml -o junit_family=legacy

pytest --cov --junitxml=testreport.junit.xml -o junit_family=legacy  // example
The above snippet instructs pytest to collect the result of all tests that are executed in this run and store as <report_name>.junit.xml. Be sure to replace <report_name> with your own filename
3. Upload this file to Codecov using the CLI
The following snippet instructs the CLI to to upload this report to Codecov.
codecovcli do-upload --report-type test_results --file <report_name>.junit.xmlBe sure to specify --report-type as test_results and include the file you created in Step 2. This will not necessarily upload coverage reports to Codecov.
4. Upload coverage to Codecov using the CLI
Codecov offers existing wrappers for the CLI (Github Actions, Circle CI Orb, Bitrise Step) that makes uploading coverage to Codecov easy, as described here.
If you're running a different CI, you can upload coverage as follows
codecovcli upload-processThis is also described here.
Go ahead and merge these changes in. In the next step we'll verify if things are working correctly.
Ensure you're always uploading coverage and test results to Codecov - even if tests failIf tests fail, your CI may stop there and not execute the rest of your workflow.
If this is the case, to make sure test results are uploaded to Codecov, you will need to add some configuration so that your CI will run the steps to upload to Codecov, even in the case of test failures.
For Github Actions, there are a couple of ways to do this:
Verification
-
You can inspect the workflow logs to see if the call to Codecov succeeded. Specifically you're looking for

-
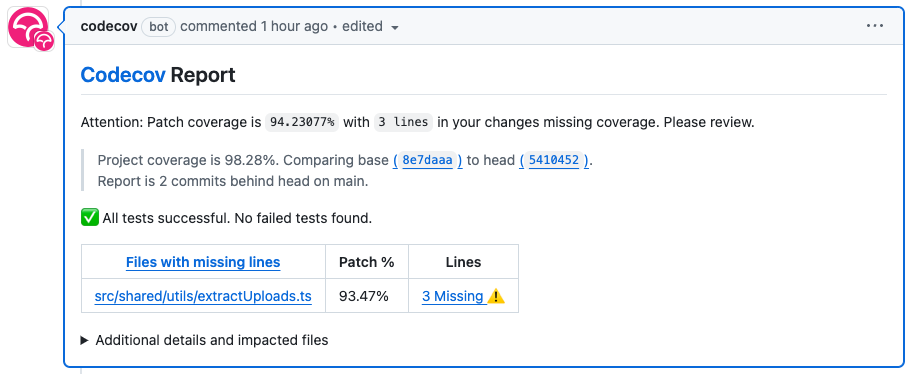
Any new PR comment with Coverage information will show the following message if Codecov has received a test report

-
After Codecov finds a failed test on a commit, you can see that the Codecov PR comment has changed

Flags
Flags should be attached to your test results uploads if you are running the same test suite in multiple environments. For example if you run your python tests once for each of the last 4 python versions that you want to support.
When using the action
You can provide a comma-separated list of the flags you want to attach to the flags argument of the action:
- name: Upload test results to Codecov
  if: ${{ !cancelled() }}
  uses: codecov/test-results-action@v1
  with:
    token: ${{ secrets.CODECOV_TOKEN }}
		flags: flag1,flag2
When using the CLI
You can use the --flag option multiple times to specify the flags to attach:
codecovcli do-upload --report-type test_results --file <report_name>.junit.xml --flag flag1 --flag flag2Reporting
Tests Tab on the Codecov UI
You can navigate to the Test Tab on the Codecov UI to find key metrics for your tests. By default, Codecov will pull results for the configured default branch.
Codecov also has Test Analytics for all branches - you can load those in by selecting the appropriate branch from the Branch Context tab.

You can sort by Average run duration, failure rate and commits failed.
Custom reports
You can create custom reports using the Test Results API
Data Retention
We currently store test results on Codecov servers for 60 days.
Troubleshooting
- Ensure your
CODECOV_TOKENis set - Ensure your coverage file is being generated.
- Ensure your tests result file is generated correctly and is in xml.
- By default, Codecov automatically scans for files matching the
*junit.xmlpattern. If you're using the Test Results action you can instruct Codecov to look for a different pattern or glob using either thefileorfilesparameter. - Our test results parser expects the following fields to be present. Here's typically what a report that is processed successfully can look like
<?xml version="1.0" encoding="UTF-8"?>
<testsuites name="jest tests" tests="2" failures="2" errors="0" time="1.007">
    <testsuite name="undefined" errors="0" failures="2" skipped="0" timestamp="2024-02-22T19:10:35"
        time="0.955" tests="6.4">
        <testcase classname=" test uncovered if" name=" test uncovered if" time="5.4">
        </testcase>
        <testcase classname=" fully covered" name=" fully covered" time="7.2">
        </testcase>
    </testsuite>
</testsuites>
- By default, Codecov automatically scans for files matching the
Updated about 1 month ago